
Hey, Tea Lovers! Let’s learn about Spring Boot Rest Framework Annotations. It’s so simple and fast. In this post, I will try to explain different annotations for Spring Boot Rest API. These annotations are must need for a REST API in Spring Boot.
I would be happy to connect with you guys on social media. It’s @coderstea on Twitter, Linkedin, Facebook, Instagram, and YouTube.
Please Subscribe to the newsletter to know about the latest posts from CodersTea.
We are building a Tutorial series on the Spring Boot. I will update this post once we publish the series. Please let me know what would you like to include in the tutorial.
Prerequisite to Start with Spring Boot Rest
The most required thing to know is Spring Container or IOC. Along with that, basic knowledge of Java Annotations is a must. As Spring Boot Application is full of Annotations. Last but not least, the REST concept should be cleared, at least the basics. Such as GET, POST, PUT, DELETE and Request body and response, headers, etc. Don’t worry, these are not complicated topics. A simple google search and a 15-20 minute reading are sufficient.
Creating Spring Boot Project on Spring Initializr
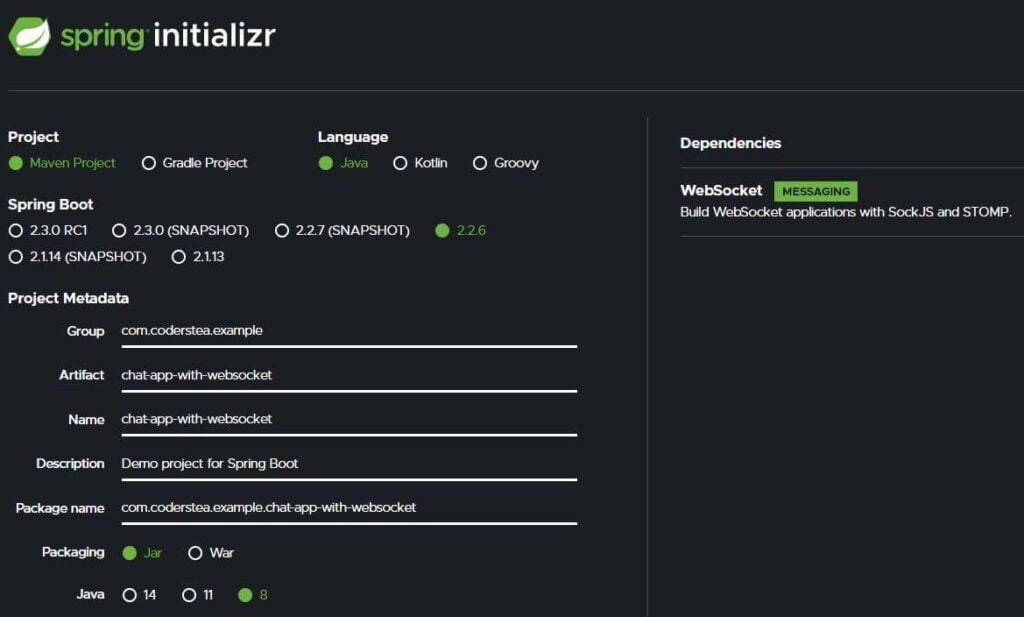
One of the best things about Spring Boot is that it has a web application for getting started. Just a few form fields and a button click and you get the starter files ready. This includes pom.xml and all the required dependencies. Simply go to Spring Initializr. Fill out the appropriate data as shown in the screenshot below. Then click on Add Dependencies button in the right top corner. Type and select Web. I will be adding Lombok as well for logs and POJOs. You can know more about Lombok on Say Good-Bye to Boilerplate Code with Lombok: Part 2-The Code.
After you are done, simply click generate button and a zip file containing the files (pom.xml) will be downloaded. Extract it and open it in your IDE. I will be using IntelliJ IDEA. This IDE helps me be productive with various features. For shortcuts, You Only Need These 7 IntelliJ IDEA Shortcuts to Skyrocket Your Productivity and with plugins 7 Must have IntelliJ IDEA Plugins in 2021 for Java Developers.
Annotations for Spring Boot Rest
The whole Spring Boot relies on the Annotations. There are various Annotations for different requirements and processes. For the REST there are 4-5 major Annotations. Let’s see them one by one and apply them to our example.
@RestController
The @RestController Annotation is used in the class. It defines the class as a Controller for Rest. This is a RESTful version Controller with an added combination of ResponseBody. With this, your response automatically gets converted to JSON, XML, or any defined response type without the need for ResponseBody annotation separately.
@RestController
public class ArticleRestController {}Code language: PHP (php)The remaining Annotations are used under the class of @RestController.
@RequestMapping
Used for mapping the specific endpoint to a function or method. This helps to define the endpoint’s path, method, response type, request type, etc.
@RequestMapping(value = "/articles", method = RequestMethod.GET,  produces = "application/json")
public List<Article> getArticles() { }Code language: CSS (css)
The above example value represents the path it maps to. Example, localhost:8080/articles. The method type is GET and it produces “application/json” as a response (however, it’s default and you can skip this).
@RequestParam
The Query Parameters in the URL i.e ?key=value&key1=value1 are fetched by @RequestParam annotations. This is used on the function’s parameters. It has various options such as required, defaultValue, etc. The query parameters then get loaded to specified parameters.
@RequestMapping(value = "/article", method = RequestMethod.GET)
public Article getArticleByName(
   @RequestParam(value = "articleName", required = true) String articleName
) {}Code language: JavaScript (javascript)
In the above example, if we call the URL GET localhost/article?articleName=springboot, the “springboot” will get loaded in the articleName parameter. I have put reuired=true, it so that if we don’t pass articleName it will throw an error to the user.
@PathVariable
Ever wonder how, without passing the query parameter, the server knows what article to load? Just look at this post’s URL. The post URL doesn’t contain the query parameter but a normal slash-separated string. The server reads it with the help of PathVariable and it looks like this, /article/{articleSlug}. Whatever string replaces the {articleSlug} will be treated as a PathVariable.
@RequestMapping(value = "/article/{articleSlug}", method = RequestMethod.GET)
public Article getArticle(@PathVariable("articleSlug") String articleSlug) {}Code language: CSS (css)
Keep in mind that the {articleSlug} should be the same in RequestMapping and PathVariable (without {}). If it doesn’t match it won’t load.
@RequestBody for Spring Boot Rest
For POST or PUT method, you don’t get all the data via URL, right? These methods have a proper request body. The RequestBody annotation helps to map the given request body to the parameter automatically. Mostly, JSON to POJO.
@RequestMapping(value = "/article", method = RequestMethod.POST)
public Article createArticle(@RequestBody NewArticlePojo newArticle){}Code language: CSS (css)
The request body will automatically get mapped to the NewArticlePojo class and populate fields based on the keys.
Specific Annotations for REST Methods
In the above explanation, you must have seen that I have written RequestMapping with a specific method. But this becomes too redundant. To tackle this, Spring Boot has predefined method mappings. These are nothing but extensions to @RequestMapping.
@GetMapping
@GetMapping is used to replace RequestMapping with method=RequestMethod.GET parameter. Now by looking at we know it’s a GET request.
@PostMapping and @PutMapping
PostMapping is to replace RequestMapping with method=RequestMethod.POST. Similarly, PutMapping is to replace RequestMapping with method=RequestMethod.PUT.
@DeleteMapping
DeleteMapping replaces RequestMapping with method=RequestMethod.DELETE.
Conclusion of Spring Boot Rest Annotations
That’s it for this post. I hope I was able to give a short and simple explanation of the different annotations used in Spring Boot Rest. As I said, we are creating a tutorial series, keeping in mind the latest Spring Boot Feature. This post was just to try and see what people are looking for in the Spring Boot. So I would appreciate your feedback on this.
I would be happy to connect with you guys on social media. It’s @coderstea on Twitter, Linkedin, Facebook, Instagram, and YouTube.
Please Subscribe to the newsletter to know about the latest posts from CodersTea.